Paper Embroidery Hanging Wall Decoration
I love small embroidery hoops! More often than not, I find myself picking one up from the local craft store and usually without a specific project in mind. It’s so hard to resist when they are less than two bucks each (or even less with a store coupon)!
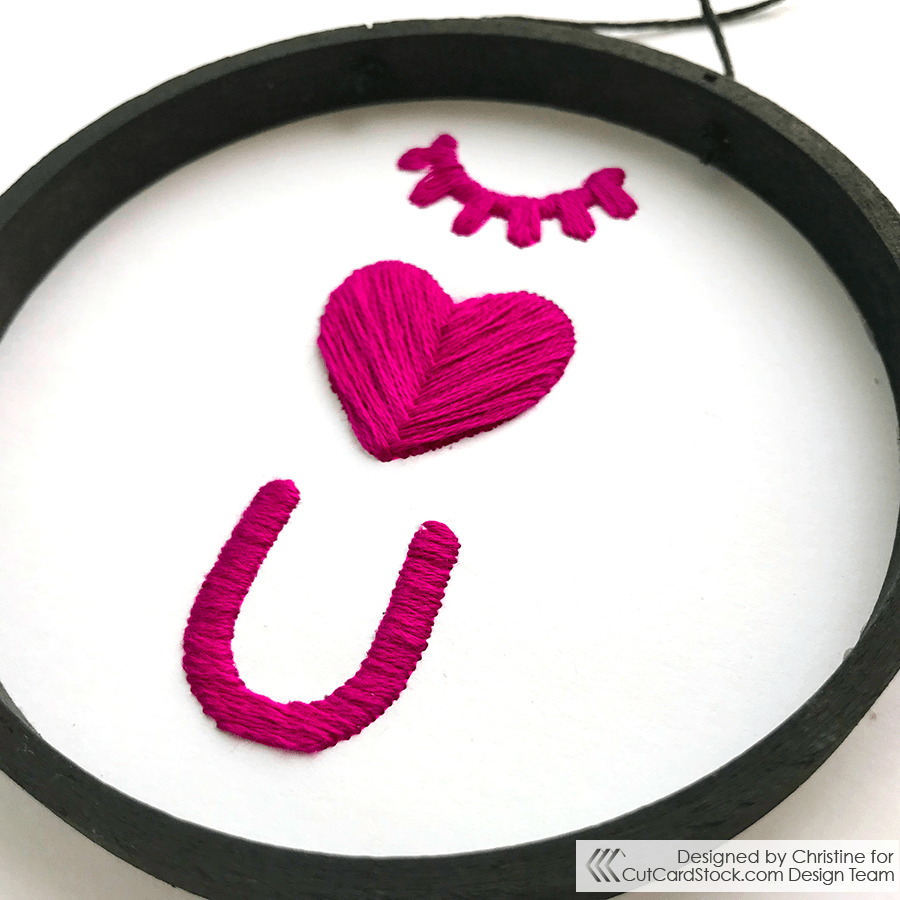
Thankfully, I came across this super cute “Eye Love You” Silhouette cut file designed by my dear friend Rachel of Sweet Elsie and knew I had to use it in a project!

Today’s project features Classic Crest’s smooth cardstock in 100 Bright White. I love that this paper is also 100% recycled! Bonus!
Starting with the Silhouette Studio design software, I drew a circle that was larger than my embroidery hoop. My circle was 5 inches wide while my embroidery hoop was 4 inches wide. If you don’t have a diecutting machine like the Silhouette or Cricut, you can easily use a circle cutter or go old school and trace around a household object like a cup or small plate that has the same diameter as your embroidery hoop!
Then, I had my Silhouette CAMEO trace the cut file shape with a sketch pen. Tip: Pick a color that best matches the embroidery floss so that the sketch blends in and/or can be easily camouflaged by the threads. Again, if you don’t have a Silhouette CAMEO, you could send your design to print via your home printer. Lots of ways to do the same thing!
For this project, I only used the inner embroidery hoop and painted it with black acrylic paint.

While the paint was drying, I started the fun part…paper embroidery! I threaded two individual strands through my regular sewing needle, knotted the ends, and started sewing away. Here’s a good trick when working with paper, first poke a hole on the front side with your needle versus from behind as you normally would in regular sewing. This pre-step will push the teeny tiny paper fibers backwards and won’t be easily seen from the front.
Since the heart shape had a large open space to fill, I used a filling stitch similar to the raised fishbone stitch. The overlapping effect of this stitch helped hide the traced heart-shaped line.
When I ran out of string, I would simply knot the ends and start again with two new embroidery floss strands.
Once I finished the embroidery, I used Tombow Mono Liquid Glue to adhere it to the back of the painted hoop.

For any area where the paper extended beyond the hoop, I used my Xacto knife to trim off excess. The Penblade Safety Trimming Knife would work well too!

To make this hoop a hanging hoop, I slowly pierced a pushpin through the middle of the hoop, threaded through black twine, knotted it, and cut off the excess.


The bright white of the cardstock is the perfect “canvas” for this paper embroidery project and helps the vibrant magenta embroidery floss “pop!” Mixing media is also a fun way to add visual/textural interest!

This adorable paper embroidery hoop is now hanging in my kids’ bathroom – a perfect reminder this Valentine’s Day! 🙂
I had a fun time working on this project and even did most of it while watching movie. Netflix and chill sew! So if you haven’t tried paper embroidery, save this project to Pinterest!
xo,
Christine (@studio_xtine)


