Rainbows & Sunshine

All of us have those days when we feel down, and we know there’s at least one person in our life that can bring a smile to our face no matter what. For me, one of those people is my darling Niece. She has such a big personality, and she’s only 3! She is my “Rainbow”.
I came across this cut file from Confessions of a Paper Addict, and I immediately thought of this picture! And her adorable outfit was perfect for drawing inspiration from!

I started this only knowing I wanted a lot of color, sparkle, and that I wanted that cut file to be “WOW”. I pulled out a sheet of all of the following: Basis Aqua, Basis Black, Basis Teal, Basis Coral, Cougar White, Solar White, Pink Sapphire Glitter; and piled them with my picture and cut file. Not sure, at all, what exactly was going to come of it, for I had no plan other than color! Lots and lots of color!

For the cut file, I decided to use the Solar White cardstock and watercolor a rainbow on part of it, to use as the backing for it. I had lots of different things I could use. From Art Crayons to Metallic paints, Shimmerz paints, acrylic paint, making my own with embellishment mousse or pigment powders. However, there was one that would give me the bright beautiful colors of the rainbow, that would blend perfectly and had the array of colors to the get the perfect rainbow!


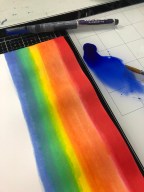
I went with the gorgeous pigmented Watercolor Markers from Vicki Boutin! Since these markers are so heavily pigmented, I did not use them directly on the paper. Doing so the colors would be so dark, and wouldn’t blend the way you want an ombre rainbow too. So I put the pigment on my mat, added some water from my mister, and used a separate brush to apply the color. alloying each layer to dry before adding another layer of color to get the bright color I was looking for. When it comes to using a watercolor its always best to go lighter first. You can always add to it, but you can’t take away. A little lesson I’ve learned.

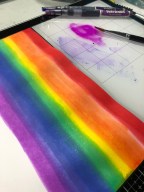
Here is the finished rainbow. If you haven’t already figured it out, I LOVE sparkle! Glittery sparkly shimmer goodness! I love it all. I pulled out my all time favorite shimmer spray from Imagine, it contains no color, it is simply shimmery splendid-ness. Yes, I made that word up. I hold up the bottle a good bit away from the paper, and start spraying. Doing so will allow the shimmer to coat evenly, and reduce the amount of large deposits on the paper. It’s so pretty.

I went with the Basis Aqua Cardstock for my background. I wanted the illusion of clouds. I used an Iridescent glaze mixed with a white watercolor pigment, added water till it was running. I put 4 puddles on my background paper, and using a straw blew the puddles of iridescent white into splotches, so when the everything was added on, it would, hopefully, give that cloud like illusion behind the rainbow title.

All that iridescent goodness needs to time to dry, so I backed my cut file. I absolutely am in Love with the way it turned out. I knew the title alone wasn’t going to be enough, so I came across a rainbow butterfly sheet of patterned paper, what could go better? As my background dried, I also fussy cut these awesome butterflies to coordinate with the title.

Now, the beautiful picture of my adorable Niece. I pulled over all those colored cardstock, and starting with the glitter cardstock, I started layering those colors behind it. Some of them i used to fully back the photo, and others I partially backed with, the Teal I used to partially back one end, and then moved it and backed a separate end. There is no reason I put them in the order or way I did. I just did. If it feels right I go with it.

For some extra details, before adding all my butterflies, I pulled out a simple white paper doily to add behind my photo, a lot of color going on, and still more coming, I felt there needed to be some white space, it breaks up some of the colors, put also pops that photo out so it doesn’t get lost. I added one of my favorite embellishments as well, epoxy flair from ScrappinHappyStudio. This set is Rainbow.

I added my butterflies with some Adhesive Foam Dots. I also added another favorite embellishment.. Sequins! from SpiegelmomScraps. This is the DayDreamer Mix, that I’m very sad to say, is currently out of stock. As always I added my Nuvo Crystal and Glitter Drops. They added so much sparkle, and detail. Especially to that title! Look at this!

I used my all time favorite Stardust Stickles to outline my cutfile, all except the “Rainbow” that I used an array of Nuvo Glitter Drops that matched those watercolors.
I hope you found some inspiration from this layout today. I try to bring a rainbow to someone as often as I can. We all need them right now!
Stay Safe & Happy Crafting!
xoxo,
Melly


Totally cheered me up! Love the rainbow colors and clouds effects!